Showing posts with label tutorial. Show all posts
Saturday, September 21, 2013

Como criar um blog gratis

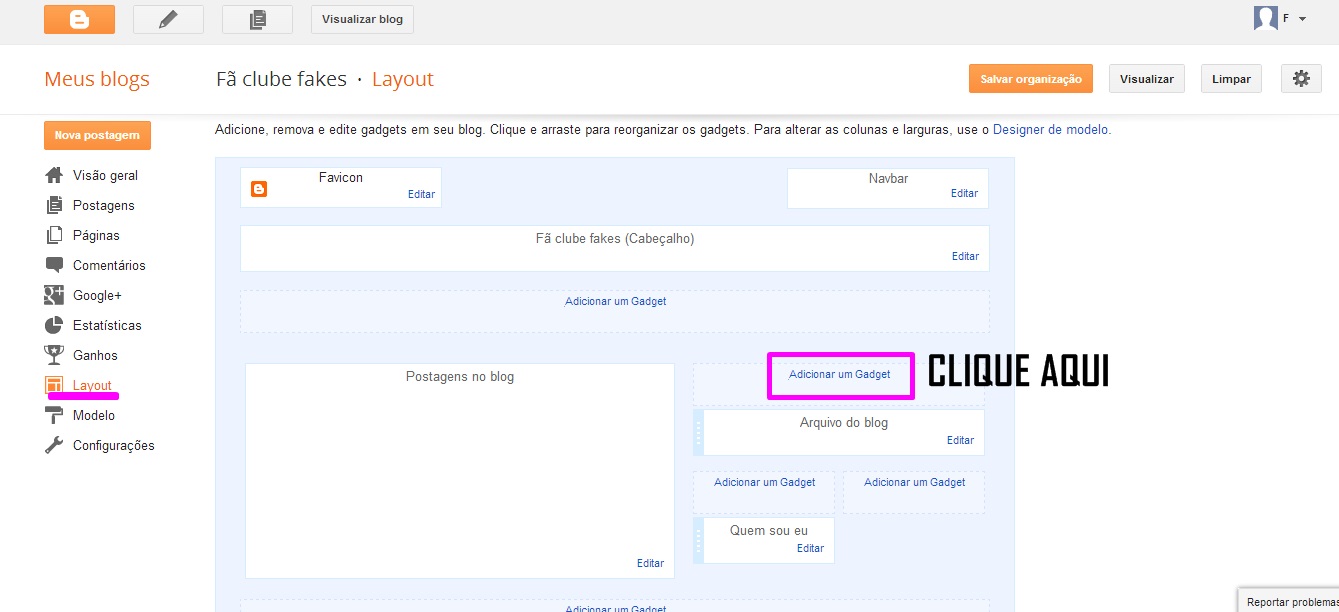
O proximo post será como arrumar o blog, a aparência e outas coisas básicas.

Blogger | via Tumblr

Para fazer um blog no blogger, é MUITO fácil e é gratuito.
Primeiro passo: Sobre o que será o blog? Existem vários tipos de blogs com diversos conteúdos.
Dicas:
-Sobre fotos
-Moda ,beleza
-Noticias dos famosos
-Um diario onde você conta seus dia-a-dia

Depois escolha um nome crativo e que tenha algo relacionado ao conteudo do seu blog.

Existem vários sites para você criar seu blog mas o melhor que existe é o blogger (ele é gratuito).
ACESSE: BLOGGER.COM
cria sua conta no google, logo após isso crie seu blog, se estiver com duvidas veja como neste video:

É isso,duvidas só comentar, beijos!
Wednesday, August 14, 2013

FACIL: Como criar um blog

Quem tá querendo criar um blog, seja de fotos, beleza ,moda etc ? é bem facil, de uma olhadinha no video abaixo e você aprende:
Sunday, July 28, 2013

Como fazer um menu / colocar os links

{blogueiros iniciantes}
Uma menina me perguntou como eu coloco os links que ficam na coluna aqui do lado, é bem fácil, então pra quem não sabe olha aqui o tutorial:

-Entre no Blogger.com faça seu login, dai ira abrir o painel com seu blog
-Vai ter seu blog e o icon para criar uma nova postagem, e do lado vai ter outro icon com duas folhas, clique nele e ele abrira e vai aparecer : Visão geral, postagens,ganhos... LAYOUT , clique em layout


-Vai abrir uma nova pagina , então vá até onde é a coluna ( lugar do lado das postagens) e clique em ADICIONAR UM GADGET


-Depois que você clicou em adicionar um gadget vai abrir uma nova janela, então você vai descendo a pagina até achar LISTA DE LINKS quando achar clique em um icon com um +.


-Quando clicar no icon com o + vai abrir uma nova pagina CONFIGURAR LISTA DE LINKS.

Título : Coloque sobre o que são os links ,por exemplo: fotos fakes, moda , beleza

Números de links a serem mostrados: Deixe em branco não coloque nada

Classificação : Não mexa em nada

01.Novo URL do site: você vai copiar o link (o que fica na barra de endereço ex: http://super-
fakes01.blogspot.com.br/) e vai colar ali

02.Novo nome do site: Você só vai colocar o nome da postagem
 Depois clique em ADICIONAR LINK , coloque quantos links quiser e depois clique em SALVAR .


Pronto, só visualizar seu blog que você vai estar com o menu ali! Alguma duvida? Beijos!

Wednesday, June 12, 2013

Hair tutorial: How to tie a scarf in 7 ways!

So I haven't taken any photos lately, I could blame the fact that I recently lost my tripod in an incident involving a picnic and a department store bathroom, but really I'm just lazy and too shy to photograph in public. Instead I have a post involving about tying a scarf in your hair, 7 ways! I actually love wearing scarves in my hair, it's fun and looks nice too! It's good for summer when I like to carry a light scarf in case the weather turns sour or if it starts to rain.

The scarf I'm using is one I was sent by Front Row Society (FRS) late last year, I've introduced them before but I thought I'd write a little more now. FRS create a variety of products; scarves, swimsuits, leggings, bags, and shoes. The twist is in the fact that they allow anyone to submit designs according to a theme (approximately monthly) and then a small selection of winning designs is chosen through votes by the public. The winning designs then go into production and anyone can enjoy this democratic product. My scarf is still available and on sale for £18.

Method 1: Ponytail bow
Pull hair in a high ponytail, loop the scarf around the ponytail a few times and then tie it into a big bow on top.

Method 2: The 'turban'-style headband
Centre the scarf at the back of your head, bring both ends to the front and twist them around one another by 180°. Bring both ends back around your head and tie them into a small knot at the back, tuck the knot under the middle of the scarf to hide the ends.

Method 3: Grace Kelly
Drape the scarf over the top and back of your head then loops the ends around your neck and tie into a small knot that can be tucked away. Put on sunglasses for the full Grace Kelly effect, be fabulous!

Method 4: Twisted flower
Start by tying the scarf around your head with the knot at the front. Twist the scarf ends in opposite directions then twist them together. Continue twisting until the scarf starts to fold in on itself then arrange it in a spiral. Once you reach the ends, tuck them in under the spiral and through the centre of the flower You can use a safety pin if you're scarf doesn't stay on it's own.

Method 5: The full 'turban'
Wrap the scarf around the back and top of your head. Twist the ends around one another by 180°, bring them to the back, tie a knot and tuck in the ends.

Method 6: The slightly 70's hairband
Wrap the scarf around your head and tie it at the back, bring both the ends over one shoulder.

Method 7: Bun bow
Pull hair into a high bun, wrap the scarf around and few times and then tie a bow in the back.
Thursday, January 24, 2013

Tutorial: Knee Patch Tights


Labs have started up again which means I have fewer days to get photos and sometimes on those days I'm so tired I'd rather stay in bed all day. Instead I bring you posts in the form of tutorials and other things I can photograph at home. First up is this; a tutorial for making knee patch tights. It's simple and quite cute, I've seen them for sale but they're much too expensive for my budget. Besides, why buy when you could DIY? I'll admit, these didn't turn out as well as expected. I should have stitched the edges before attaching them to the tights to prevent fraying. On top of all that I sewed them with my knees bent so they look a little silly when I stand up. At least I know for next time and I can share these tips with you! Next up on my list I might re-make my circle skirt tutorial with decent photos and full instructions, keep an eye out for it!
Materials

*A pair of tights
*Some fabric
*Needle and thread

Let's begin with the basics, the tights. They should be a high denier or, even better, made with cotton or wool so that holes don't lead to laddering. They also need to be quite close knit so that anything sewn on stays in place. For fabric you can choose almost anything. Stretch fabrics will work well because they'll take on the shape of you knees but they might fray more easily. This would look great with some leather-look vinyl or lace.
One

First you'll want to make the patches. To do this, get a piece of paper and sketch out a rough oval shape that fits the size of your knee. Then fold that paper in half and then in half again and cut along the line you've drawn. This will help obtain a smooth curve. Unfold the paper and make sure it looks about even. Then trace the shape onto some fabric and cut out the shapes.

If you're working with a thin fabric that might fray you can cut out four patches and sew them almost all the way around (right sides together) in pairs. Then turn those inside out and sew them onto the tights. That way there are no exposed edges. You can also use a blanket stitch or some form of stitch around the outside to stop the edges fraying.

Two

Sewing on the patches. First you'll want to baste the patches onto the area you'd like them to be, do this while wearing the tights.

Then, take off the tights and go around the edges and use small stitches to attach the patches to the tights. I used an overcast stitch which prevents fraying and I attached the patches at the same time, killing two metaphorical birds with a single length of thread. Remember to remove basting afterwards (which I didn't do for these photos).
Saturday, April 30, 2011

Tutorial: Floral headband/wreath

I meant to post this quite a while ago, had I not left my laptop behind over the holidays I would have had it done much sooner. Alas, there is nothing to be gained thinking of what could have been. This project was sparked into existence when I stumbled upon the loveliest little flowers in a small haberdashery in Staines. I'd gone with the student newspaper team for a trip the the nearest amusement park, spending most of the day on the teacups with a good friend of mine. We left a little early and took the shuttle back to the train station, and were it not for my stupidity and our getting off at the wrong stop we would have never found this treasure. Little mistakes are sometimes magical.

Ah, back to the tutorial!
The only materials needed are flowers, as the flowers I used have long wire stems. If you are using flowers without stems (pound shops are good for finding cheap plastic flowers), find some low gauge wire which you could cover in green ribbon once the headband is done or paint green if that suits you better. Alternately, the flowers could be attached to an existing headband, if you wish to take the easiest route.


Step 1
Measure the circumference of your head at the point at which you would like the headband to sit, allow a little room, the flowers are light and the headband should generally cling to your hair rather than needing to fit too snugly. Lay out this measurement on a flat surface and arrange the flowers so that they are equally spaced along it.


Step 2
Twist the wires of the flowers together to join them. Make sure to tuck in the ends tightly so that they do not snag on your hair as you put the headband on and off.


Step 3
Feel free to add some twirls and swirls or leave or flourishes of any other kind, to make your headband even more unique.


Voilà, it is done!
Now go dance and prance, like the faeries that come out at night and scatter their magic among the roots of the ancient trees of the forest.


The dress in these photos is from Topshop
Wednesday, August 18, 2010

Panel skirt tutorial

So I had someone ask me if I'd used a pattern for the skirt I made, I didn't but I decided to make a mini tutorial explaining the process I went through to create it. This tutorial doesn't go into too much detail and it assumes that you already have basic sewing knowledge, for example sewing in a zip or sewing a hem. If you need help with things like that there are heaps of videos on youtube, and on threadbanger to help.

Click to view full version

Let me know what you think, I'll try to document the process of my next project just in case you guys enjoy this. I'd love to hear your feedback! Cheers!
 
© Copyright 2011 FasHion sToRe All Rights Reserved.
Free Templates by Cool Blogger Tutorials- Powered by Blogger.com.